Provisioning Sharepoint Sites and their customization often becomes a time-consuming and unattractive task. To step up this process, you only need an E3 license. This process allows you to create sites and subsites using a Sharepoint List that will trigger a flow, thus creating a new site from a customizable template.
Create a Sharepoint List
The first step is creating a Sharepoint List:
- Title (single line of text)
- Description (single line of text)
- State (Choice – Provisioning /Success/ Error)
- URL (Hyperlink/Out of the New Item From)
- Owner (People)
Note: The fields above don’t have to be these ones. These are the most indicated for the chosen template.
Create a Template and Save Request
To create a template, it’s firstly necessary to create a new page that will be the process skeleton. For the demo, we will be using 4 web parts only:
- Text Web part with the chosen description.
- Web part Document Library with Documents Library.
- Web part People with the person chosen from the list.
- Web part News.
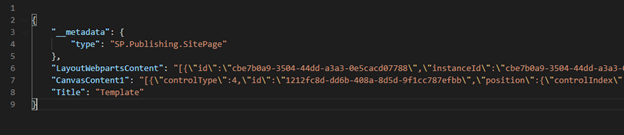
When the page is published, a request to Sharepoint will be submitted to update the page. This request’s JSON will be our template.

And the result will be something like this:
Create Power Automate
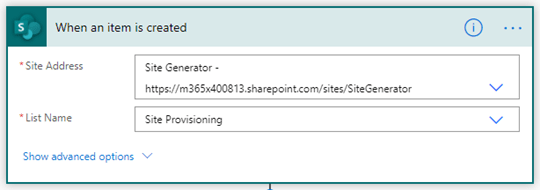
The trigger will be “When an item is created”.
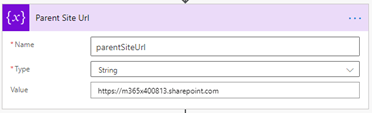
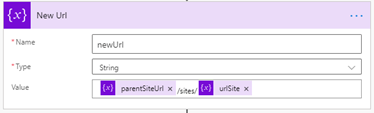
For the second step, we’ll create 3 helpful string variables:
- parentSiteUrl (company URL).
- urlSite (formatted Title).
- newUrl (new site URL).
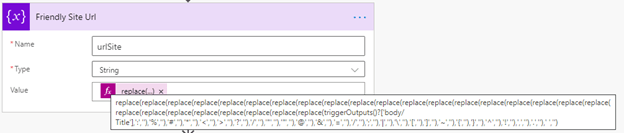
replace(replace(replace(replace(replace(
replace(replace(replace(replace(replace(
replace(replace(replace(replace(replace(
replace(replace(replace(replace(replace(
replace(replace(replace(replace(replace(
replace(replace(triggerOutputs()?['body/Title'],':',''),'%',''),'#',''),
'*',''),'<',''),'>',''),'?',''),'/',''),
'"',''),'"',''),'@',''),'&',''),'=',''),
'/',''),';',''),'|',''),'\',''),'[',''),
']',''),'~',''),'{',''),'}',''),'^',''),
'!',''),',',''),'.',''),' ','')
Create a site
Before creating a new site, we need to verify if the current site is available. To check it, we used a simple Get Request to a new Site URL. If the request fails, we can then create the site.
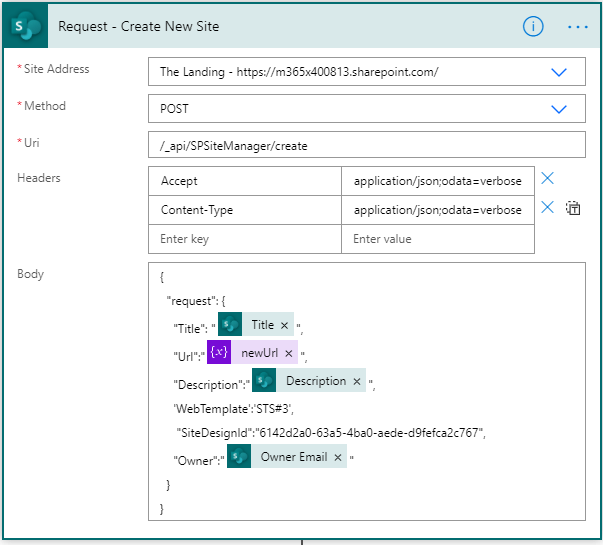
To create the site, we’ll send a POST request to ‘/_api/SPSiteManager/create’.
Headers:
{
  "Accept": "application/json;odata=verbose",
  "Content-Type": "application/json;odata=verbose"
}
Body:
{
"request": {
"Title": "Title Example",
"Url":"newUrl",
"Description":"Description Example",
'WebTemplate':'STS#3',
"SiteDesignId":"6142d2a0-63a5-4ba0-aede-d9fefca2c767",
"Owner":"Email Owner"
}
}

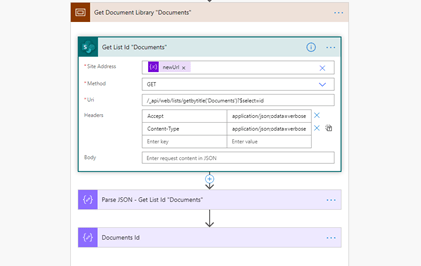
Get the Document Library Id
For this template, since one Web part is a Document Library, it’s necessary to identify the Id of the new Documents Library.
Get the File Id & Check Out Page
Save for some rare exceptions, the Id of the Home Page file is always 1. Even so, we’ll request the Id of the page “Home.aspx”. Afterward, we’ll request the check out to the same page ‘_api/sitepages/pages(1)/checkoutpage’.

Update a page
In this step, we’ll update the Home Page’s layout. We are going to do a POST request to Sharepoint using the previously extracted JSON. To do that, we’ll have to update the current template using the values of the current site. In this case, we must pay attention to the following cases:
- At the Text Web part, we need to replace the default text with the field Description.
- The Web part with Documents Library is necessary to change the Id of the selected List.
- For the People Web part, we need to replace the name and email of the chosen owner.
- Lastly, it’s necessary for Webpart News to change the value ‘baseUrl’ for the new site URL.
The already configured JSON will be used at Body of the next request ‘_api/SitePages/pages(1)/savepageasdraft’ as we can see below.

Publish a page
To finish the process, we need to publish the new changes. To do this, we must do a POST request to ‘_api/sitepages/pages(1)/Publish’.

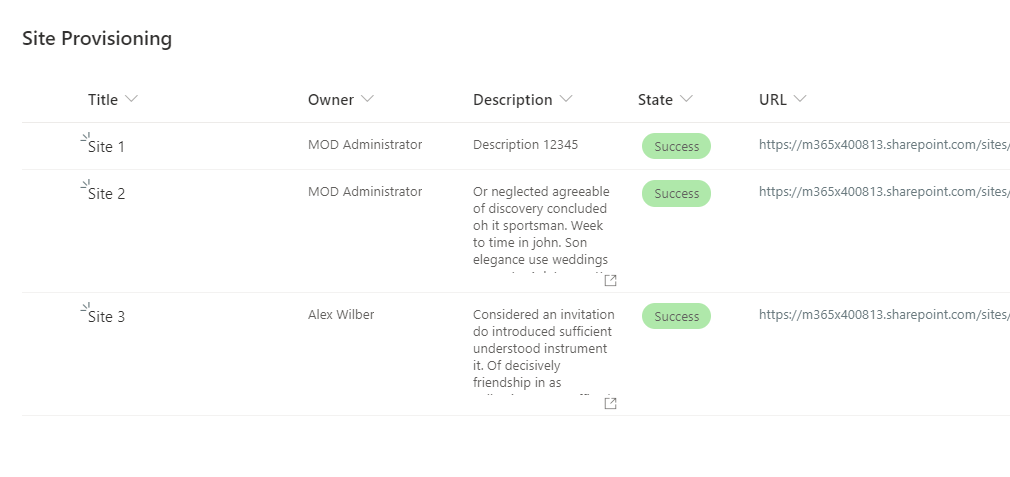
To control the process, the last step is updating the list Item.
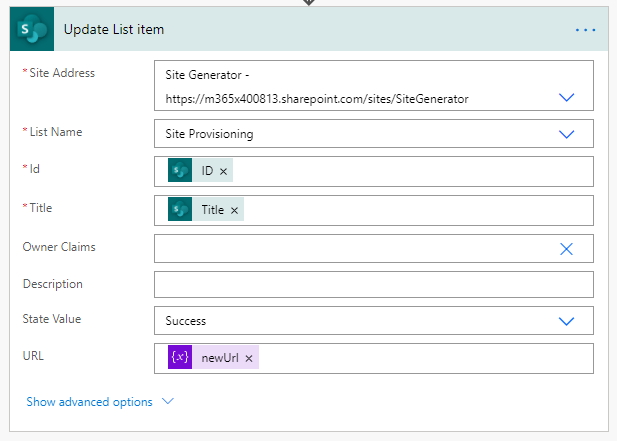
With the registration of these reports, the list will look like this one.
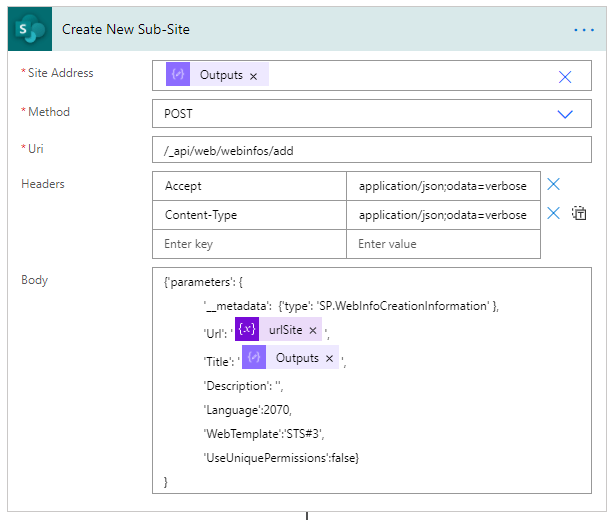
Create a Sub-Site
The current process can also create Sub-sites, although it’s necessary to change the POST request (‘/_api/web/webinfos/add’) when creating them.
Sharing is caring!


1 Comment
breezy · December 16, 2020 at 8:46 pm
This would be a wonderful tutorial if you didn’t put a good bulk of the less straight forward pieces in a MOVING GIF! Please put them in a static image for people to be able to follow along as this is a bit frustrating and makes what is a really neat tutorial pretty bad.